Monday, July 31, 2017

Planning with Sticky Notes

Planning with Sticky Notes 2 Do you want to change up your planning routine this year?  Last year I tried planning with sticky notes and it was GAME CHANGING. I'd previously typed my lesson plans, but I coveted those colorful planbooks that I saw all over my Instagram feed (even though the cost made my eyes water).  So 2 years ago I created my own.  I loved the colors and it had exactly the right amount of space for monthly overviews, weekly lessons and to do lists without a lot of extra pages taking up space.  But at the end of the year the thought of throwing out the used pages broke my heart.  I couldn't see storing them year after year, either.  So my solution was planning with sticky notes!

I've uploaded a FREE video where you can learn more about tips on planning with sticky notes on Teachers Pay Teachers if you'd like more information, or if you prefer, just read on. 

Storage

I store spare sticky notes on plastic sleeve within the planner.  I have them sorted out by color so I have what I need for each subject. You can also use page dividers or the inside cover of your lesson planbook.

Planning with Sticky Notes Video Cover Color Code Planning with Sticky Notes

I like to use a different color sticky note for each subject so I can see the progression of each over the course of the week.  That also allows me to take them down at the end of the year and compile them by unit.  I do occasionally mix up the colors if I'm doing an integrated thematic unit.  If I'm covering writing standards in a science lesson, for example, I would put it on yellow (for my science color).

Moving NotesPlanning with Sticky Notes 1
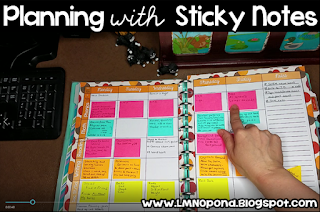
For two day lessons, I put the note on the first day and leave the second day blank.  Similarly, if I plan 5 writing lessons in one week, but I need 2 days for a lesson, I move the sticky notes along and put the last one in the "next week" section of my to do lists.  No arrows, crossing out, or rewriting necessary!  And I don't know about you, but at my school last minutes changes are pretty much a weekly occurrence.  It's the number one reason that typing my lesson plans were not working for me anymore.  So if flexibility is more important to your school culture than consistency, this system will make your life easier, I promise!

Similarly, some days I find that a lesson bombs (keeping it real, here, people).  So it’s back to the drawing board; I need to insert a new lesson for the next day.  I can just move tomorrow’s lesson along and stick the new lesson in for the following day.  

Planning with Sticky Notes 3Multiple Mini-lessons

If you are planning a new set of 2 (or more) mini-lessons for a single day, and you won't necessarily teach them on the same day next year, you can cut your sticky note in halves, thirds, and so on.  For example, you may find that your group of kids this year need a lesson on cooperation right before a lesson that includes a phonics game.  I would cut my sticky note in half and save that phonics lesson for next year, but I would either discard the cooperation lesson or put it in a section on classroom management.

Planning with Sticky Notes 4Planning with Sticky Notes: Additional Uses

I use sticky notes for test makeups and put them directly in my planner as well.  I put it in the “Notes” sidebar for the week with the name of the test and students who need to make it up.  

My To Do Lists (Make, Copy, Prepare, and Do) are on sticky notes as well.  That way if there are things I haven’t crossed off on Friday, I can carry it over to the next week.  

Putting notes for the week on sticky notes instead of writing them in allows me to save my pages for the following year.  You'll see that I didn't do this consistently this past year, so I will reprint some pages next year, (although the borders are colorful, my own planner doesn't use that much color ink; it has plenty of white space) but the more you use sticky notes, the more pages you can save!  

Planning with Sticky Notes 5Key content, such as spelling lists, can also be recorded on sticky notes.  I actually typed mine (on 3 x 3 inch sticky notes, then cut them down to size).  This way my key content for the week is highlighted.  The vertical list stands out against the wide sticky notes containing my actual lessons. 

Planning with Sticky Notes for Organizing for Next Year

At the end of the year, I compile the stick notes from each unit by month (notice how the colors lets me organize with ease).  This helps me stay on track with my pacing.  I put all the sticky notes from May onto the page divider, since it's durable plastic and can stand up to the weight of all those sticky notes.

Planning with Sticky Notes 6Materials

You could use a 3 ring binder, but I use a Martha Stewart Discbound Planner (for a hard cover) with Levenger 1 1/2 inch discs (for smoother turning pages) because I like to fold it around and hold it on my lap.  The tabbed dividers that come with the cover are a nice durable plastic as well.  And I like the aqua color.

The boxes in my LMNO Planner are the perfect size for 2 inch by 1 1/2 inch Post Its.  I love the Cape Town Collection Post Its, but there are several really pretty World of Color collections to choose from.

I also use 32lb paper (any brand is fine) so the ink doesn't bleed through when printing.  It feels more luxurious and holds up perfectly for repeated sticking and removing of Post Its.

If you'd like to this planning with sticky notes system in action, you can stream it for free here.  I also have my LMNO Planner available for you on Teachers Pay Teachers.  If you'd like to download some FREE colorful coordinating sample pages, I have templates for your student roster, cover sheet, classroom contacts, seating chart, and more for you here.  And please let me know if you've made planning with sticky notes work for you!


My Teachers Pay Teachers Store
My Pinterest

Monday, May 2, 2016

5 Tips to Help Your Colorblind Students


Recently I saw an Instagram post about aiding a colorblind student.  I had a suggestion on how to make accommodations easier.  Then I had another suggestion.  And another.  Finally I realized, I have figured out quite a few tricks that have helped my colorblind first grader this year!  So here are some practical tips for you if you learn you will have a colorblind student next year.

1.  Accept some pictures that are not colored the way you are used to.  When you ask students to draw a picture of a dog, don't feel obligated to ask your student what color they want and give them the "right" crayon.  They will color the way they see it.  Stepping in and providing the "right" color will make them feel dependent during an activity that you could be helping them feel self reliant.  Accepting their perspective during "free drawing/coloring" times will make them feel accepted and teach the rest of your class that perspectives vary and that's not a bad thing. 

2.  When color coding is required, provide crayons with labels/wrappers on.  Sometimes a color blind person will need to color code for their audience.  Teaching your students to compensate in order to communicate their message effectively is a life skill.  As long as your student can read color words, if you say "use red to underline the nouns," they can participate.  Be sure to hold back a set of fully wrapped crayons that you collect at the end of each activity so that you can provide them every time.  If your student can't read color words yet, differentiate for your student and make them a priority during your sight word practice times.  Some will feel motivated to learn them.

3.  When in doubt, ask.  You know those popular red and yellow discs used for counting?  I pulled my student aside and asked, "Can you tell which one is red?"  Turns out he could, so I didn't need to pull out pattern blocks for him to count instead. 

4.  Modify how you present color coded information.  Here are just a few examples of how I've done this.

My old anchor chart for numbers to 20 had red and green circles in tens frames.  The red were odd and the green were even.  This was obviously not appropriate for my student, so I did create a new chart with him in mind.  If you have a chart that alternates red and green, switch it out this year.  


When we learn patterns in calendar, we use the Everyday Counts series.  Most of the "figures" vary both in shape and color.  I'm sure to always say the shape and sometimes the color as well when I refer to this visual.  When you teach patterns, use shapes instead of relying on color. 

When handing out two sets of ten pop cubes to work on numbers to 20, be sure that your colorblind student has black and white, or another set of colors that they can distinguish between.   

When playing board games such as "Bump," be sure your student can distinguish between the pieces.  If using different colored round discs of the same size doesn't work, player 1 could use discs while player 2 uses pennies, triangular pattern blocks, pop cubes, or whatever other manipulatives you have on hand.

Mark up items that you can't switch out.  We use Fundations magnet letters for the whole class that match the ones the students use.  My colorblind student can't easily distinguish between salmon (for vowels) and yellow (for consonants).  By putting a tiny sticker on his vowels as well as my whole class set, he could find his vowels as easily as his peers.  But next year the stickers can come off if I don't have another student who needs them.  

Make sure your center materials have high contrast.  If you print off activities in black and white and you can read it just fine, chances are your colorblind students can as well. My fact families page shown here has black and white visuals, making it perfect for colorblind and typical learners alike. 

5. Remember that every individual with the same broad disability is a unique individual.  Some things you should know about my student:  He's extremely laid back.  He sees his colorblindness as something that makes him different and interesting, and he does not hesitate to let his peers know about it.  He can read color words.  He confuses red and green, as well as blue and purple.  His favorite color is blue.  He doesn't like to color much.  Learn what you can about your  own student's strengths, weaknesses, likes, dislikes, and motivation level so you know how to help them.  Then share what you've learned and tried in the comment section below!

If you're interested in more activities like the one shown here, Teachers Pay Teachers (and I) are having a sale in honor of Teachers Appreciation Week.  Remember to enter the code CELEBRATE on Tuesday and Wednesday.  This sale announcement will disappear from this post following the sale.


My Teachers Pay Teachers Store
My Pinterest

Sunday, April 3, 2016

10 Ways to Solve Your Pencil Problems


In my last post I proposed an elegant solution to the pencil problem.  How do you stop lost or missing pencils from interfering with the learning process?  Give the kids pencils.  Simple, right?  Well honestly, no, or everyone would be doing it already.  There are still problems to work through, such as cost, pencil sharpening, and bickering over "he stole MY pencil!"  So here's how to make it work while showing students that you've got their backs.

1. Stop pencil-shaming your students.  Just give them a pencil every time they need one. 

2.  Present pencils as gifts and give them on every occasion.  We've seen all the cute gifts teachers package for students with poems all over Pinterest.  Snacks, toys, books.  And while I don't condemn these gifts, I've decided that a pencil outclasses them all.  Give one on the first day of school (heck, if you teach first grade, give them two; one fat and one regular pencil).  Give them out at least once per month for every major and some minor holidays.  Give kids a pencil on their birthday.  And always sharpen them before giving them out.  If you want to make the pencils cute, affix a seasonal flag like this one to it with colorful washi tape.  And/or hit up the Dollar Spot at Target for themed pencils.  But of course the cuteness factor is not the point here.  This is about reaching ending the Pencil Problem and entering Pencil Nirvana.  So if cost is one of the concerns you have about providing pencils to students regularly, remember they are cheaper than a lot of those other gifts. 

3.  Put pencils on the suggested school supplies list.  If your school is like ours, you can't send home a list of "required" school supplies.  However, many parents enjoy "back to school shopping" before the first day back.  And some parents are great about sending in a steady supply.  Some will be happy to donate pencils to the classroom as well; you just have to ask.

4.  Create a classroom policy that all pencils are "community pencils."  Now, this was REALLY HARD for me to wrap my head around when I moved from fourth to first grade.  My grade level partner told me that in her classroom all supplies are communal.  I said doubtfully, "But...their parents paid for that pencil.  I can't just let some other kid take it."  She gave me a withering look and said, "Would you really tell someone that they couldn't borrow your pen if they needed one?" 

Well...I guess not?  But...I would want it back.  I mean, if it was a really good pen.  Maybe not a regular ball point pen.  I guess I wouldn't really care about that because I can get more of those from the supply closet.

It took me some time to come around to this way of thinking, but eventually I realized that in a work environment, she's right.  These are not strangers; they are people I need to maintain a good working relationship with.  It's the same with children. 

So I embraced this policy whole heartedly...with one caveat.  I told the children that they can't say, "That's my pencil."  They have to get a new one.  EXCEPT, if they brought a pencil from home that they are not willing to share, they have to go put it in their bag, bring it home, and leave it there.  And I'm talking here about fancy, sparkly pencils that are obviously more "personalized" than your standard yellow pencils.  If they start bickering over a Ticonderoga I let them know that it's discussion over, I've got one for each of them so it doesn't matter who had which one first. 

5.  Don't let kids sharpen pencils (I know this sounds like work, but stick with me for a paragraph or two).  When I was in fourth grade, of course I let kids sharpen pencils.  The minute I moved to first I knew I was never going to let the littles near a sharpener.  If I'm honest, even the fourth graders were inefficient in their time management and their pencil holding technique.  If I ever go back to upper elementary I will have to give serious thought to whether or not I ever allow them to sharpen pencils again.  Although I know students shouldn't be coddled, asking to sharpen a pencil before every writing task is a great excuse for some kids to avoid writing.  So instead, we use the "sharp pencil, dull pencil" two can system.  I'm pretty sure the labels I use are the same ones here at 3rd Grade Thoughts.  Use of the sharp/dull pencil cans is part and parcel with the communal pencil idea.  After all, it's rare that you're going to get the same pencil back once it breaks. 

6.  Put "Pencil sharpeners" on your parent volunteer list.  Send home a bag with instructions (for example, never sharpen colored pencils in electric sharpeners because the pigments kill them).  Some parents are happy to help, but need/prefer to do so from home.  ACCEPT PARENTAL HELP.  You won't reach Pencil Nirvana if you're sharpening all the pencils.  Just don't send out all your pencils for sharpening on the same day (because if they don't come back, you'll be scrambling). 

7.  Create a system in which students can get a pencil with minimal disruption.  I find "sign language" the most effective way to do this.  This way when 7 hands go up you just need to nod to each one without breaking your stride.  And in my class, about 8 kids need to get a pencil 5 times per day.  I simply retrieve most of them from the floor at each transition time and my supply is replenished. 

8.  Spot check desks.  Giving kids an "infinite" number of pencils often results in some degree of hoarding.  Figure out who your culprits are with spot checks over the first few weeks, and let them know the limit (one or two sharp pencils, maximum).  Soon you'll know where to go to replenish a dwindling supply.  And as I said, I'm not against consequences.  I'll punish a kid for repeatedly hoarding pencils but never because their parents didn't send them to school with one.  Just consider who is really at fault in each of these two scenarios. 

9.  Hold back an overabundance of sharp pencils.  Once you put out a bunch of freshly sharpened pencils, there are some kids who will take a new pencil every 20 minutes.  You don't want to spot check desks in the middle of class, so hiding a zipped bag of sharp pencils in your desk will help you avoid stressing out when you hear, "There's no more sharp pencils." 

10.  Invest in pencil sharpener.  I have to admit, after a decade of using the standard issue pencil sharpeners at my current school, I only broke down and bought a good quality pencil sharpener last month.  But it sharpens pencils faster, it can sharpen fat pencils, and the little light that comes on when the pencil is sharp enough is more useful than I expected.  If I wasn't scared that kids would sharpen colored pencils in it, I might actually let them use it.   

It took a paradigm shift in order to reach this stage, but honestly, pencils are now the LEAST of my problems when it comes to classroom management!  So please, don't sweat the small stuff.  Just give your students pencils. 

My Teachers Pay Teachers Store
My Pinterest


Friday, March 25, 2016

An Elegant Solution to the Pencil Problem

Lately I've seen new blog posts crop up regarding what to do about "the pencil problem."  When I taught fourth grade, I kept looking for the perfect system.  They have tips on when pencils should be sharpened, by whom, what happens when a student is unprepared with no pencil, and how to keep track of pencils. 
Pencil photo from the public domain

Keeping track was definitely the worst of it.  Have any of the following sentences ever brought your lesson to a screeching halt:

Whose pencil is this? 
Where did you leave your pencil?
He stole my pencil.  
No, that's my pencil.
Nuh uh.    
Yes, look, mine had a bigger eraser.  Yours had dent near the metal part.
I read blog post after blog post about different pencil systems, trying to figure out how to fix this daily problem.  And yet, now that I teach first grade, suddenly pencil problems are not interrupting my lessons.  What's my secret?  How have I reached Pencil Nirvana?  The solution is actually very simple.

If a student needs a pencil, give them one.

It's not complicated.  Kids need pencils in order to do schoolwork.  Unless you are at a paperless/all digital school, that's just a part of life.  If you vilify the students who are not responsible enough to hold onto/maintain their pencils, that's just one more step towards encouraging them check out.  It's one small way that, as time goes on adds up every day and (without you noticing it but the kid feels it) turns into a big way, to alienate your students who are already not "good students." 

Is there a time and place to teach responsibility?  Of course the answer is, "yes."  However, if you choose to make pencils the issue on which you make your stance, you are only going to reach those students who care about stationery.  Which my gut tells me is a small percentage of students. 

You may be thinking, "But then you're rewarding irresponsible students by giving them stuff."  Well, my way of thinking has completely shifted.  I'm not just a deliverer of content.  Part of my job is caregiver, there's no doubt about it.  Part of my job is to provide for the needs of my students.  If I'm teaching them writing, it's just as much my job to give them a pencil to write with as it is to teach them to start a sentence with a capital letter. 

And in reality, I am not rewarding the irresponsible students.  Because I don't single them out.  I simply level the playing field.  I give EVERY student a pencil.  Often.  I never allow the supply of pencils to run out.  And as a result, students feel provided for.  They have one less thing they have to worry about before lowering their affective filter and "buy in" to what you're teaching them. 

I know what you're thinking.  This sounds nice, but isn't it more work than those other systems where students have to bargain with you to get something you are requiring them to use?  Not really.  In my next post I'll give you 9 tips to help you make it work in your classroom.   

 
My Teachers Pay Teachers Store
My Pinterest

Sunday, November 15, 2015

Mixing Chemicals! How We Practice the Scientific Method in First Grade


I think we all talk about scientific method, from primary up through high school.  If we teach a class in science, it's a given.  

I also think most elementary school teachers do the activity most children fondly refer to as "The Volcano Experiment," or "Making a Volcano."  Yet when I think of mixing vinegar and baking soda, I don't think of using a model to teach geology; I think of the perfect opportunity to teach the scientific method!  This was my second year teaching the Scientific Method by "mixing chemicals."  As a new (to primary) teacher last year, it went well.  This year I added a little polish, and finally have a little time to share how I made it work well.

The key to making this an experiment is to have another variable to use besides vinegar.  Since I have 5 groups, I used 5 variables, as shown above.  If you want a single variable, water is the easiest.  It won't make any bubbles because it's not acidic like vinegar.

Graphics from Scrappin Doodles
1.      I gathered the children on the rug so I could build excitement about the liquids without them sticking their fingers in as I was discussing them!   I put a different liquid on each table as we reviewed how to observe using our senses.  I made it clear we would be looking and smelling only for today, but if you can think of a sanitary way to encourage taste please let me know in the comment section!  I think it would be awesome; I just couldn't manage it in the time allowed.

2.      Next I encouraged them to walk around and go to each table to identify the liquids.  

3.      Then I guided their question (it was hard for them to articulate this when they already had a hypothesis). "What will happen when we mix different liquids with baking soda?"
4.      My class had a hypothesis before I even got to this stage in the lesson:  "It will make a volcano!" cried many students.  I wrote down their different ideas (some kids said "it will explode.") and had them each choose their own to copy onto their page.

All the while, we referred to our anchor chart from Deanna Jump.  I chopped up her mini posters to create the anchor chart, and I believe her graphics are from Scrappin Doodles. 
5   We carried out the testing part of the experiment by rotating to each table (because I do this experiment at the beginning of the year, the rotation is clearly controlled, with all groups being directed where to go each time; kids at group 1 go to group 2, kids at group 2 go to group 3, and so on), leaving the liquid and eye droppers in place and carrying only the tray of baking soda.  I also chose who got to use the eye dropper each time.  Since my students are arranged into groups with an A, B, C, and D, it is easy for me to say, "All the A's use the dropper this time." 


We didn't do all the recording in one day, but it worked fine.  Most kids remember what the bubbles look like and could record their observations with pictures the next day.  And since I had some absent, I took photos for them to refresh their memories.


On the second day we also recorded WHY different liquids reacted to baking soda and others did not.  We filled our our recording page for our science notebooks AFTER the page on sorting liquids, so students have already thought about the different properties that the liquids on each side have in common.  This lead to a result.  One of my students articulated, "All the liquids that made bubbles are sour."  This prepared them for the scientific explanation:  these liquids that taste or smell sour are acidic.  Acids react when mixed with bases, such as baking soda. I have both recording pages (along with this lesson in printer friendly format) available in my TPT store.


One more top tip:  Save a little of each liquid and baking soda on your desk as a backup!  I did not have a spill, but if you do, the group that accidentally spills can still carry on instead of joining other groups' works in progress.

The kids have been BEGGING for more science every day since this experiment.  It was hands on, showy, AND helped them learn the process involved in the scientific method through doing.


My Teachers Pay Teachers Store
My Pinterest

Saturday, October 3, 2015

First Grade Math in Focus Chapter 1 (Numbers to ten)


Anyone who's been reading my blog on a regular basis knows that last year was my first year in first grade.  During the first month I was fortunate to have a lot of help from my teaching partner and the veterans of the primary blogging community and Teachers Pay Teachers.  And I reflected on my practices; what did they struggle with and what did I need to do differently?

Math was one of the hardest subjects for us the first year.  I knew we needed a lot more hands on activities to alternate with the math workbook that we are required to use.  I just couldn't get them together fast enough. But this year I was ready!

Not all cards are pictured
The kids needed a little more practice with number words.  Math in Focus has one number word on the test that they need to write, and that number is "eight."  (Really?  I know most numbers are sight words, but of all the number words, we had to pick the one that is farthest over their heads, phonetically speaking?).  So I used number word dominoes to give them extra practice with their number words.  Although there was no copyright information on the version I "inherited," you can find a very similar number word dominoes game here for free.  Since our pretest indicated that students are able to match numerals with quantities, students refer to our anchor chart that hangs in our calendar area to check their knowledge of these number sight words.

Next, I knew I didn't do enough subitizing last year.  Some of my first graders struggled with counting last year.  To make sure those struggling kids were caught early and practiced regularly, I used the dominoes from Math in Focus for 3 different activities.  
  • First, I used them in conjunction with fish memory cards from Angelina Grimes-Graeme from Extra Special Learning.  Instead of cutting out the words and numbers, I left the pages in tact, in order.  The kids simply match the dominoes to the fish bowl.

  • Next, I had students order the dominoes backwards and forwards.  
  • The last activity was a simple game of "War" (each player flips over a card at random.  The player with the greater number wins both cards).  I modeled how we can go fast once we visualize instead of count the dots. 


Another activity that we did do last year was with simple greater than and less than symbols and numbers.  This year I differentiated the game and some students used numbers to 20.  The number bears are from Yara Habanou at the Sea of Knowledge (and graphics by DJ Inkers).  If you recognize where the greater than/less than signs are from, please let me know.  There was no copyright information on these pages.


Finally, the trickiest concept was "number patterns," which I think is more aptly named, "Counting backwards and forwards."  Continuing a sequence that required "backing up" or sequencing from greatest to least were two skills that were SO difficult for students.  Even after practicing one more and one less, (using this sheet by A. Brantley) to transfer this skill to the new context of a number line was too much of a leap.  I knew that manipulatives would be better than worksheets that had to be erased.  Markers would be more fun, but I thought of a number line activity that would be self correcting.  Most kids could see right away that their first try did not work.  Partnering the kids with more number sense with those who needed more support ensured that they could see the fix up strategy again and again.  

By rotating students through the games as well as the written work, they were much more engaged and less frustrated in math than they were last year.  The workbook was not an effective tool to help them practice at the beginning of the year.  So instead I spent time doing the pages together in order to help them get used to the process of looking for key words, using the pictures, and writing responses in the correct spot.  The time they spent on the activities were the more efficient way to practice the math concepts.  I was even able to introduce choices toward the end of the unit, so students picked the activity they wanted to work on (after they had had experience using all the activities earlier in the unit).

My Teachers Pay Teachers Store
My Pinterest
 

Sunday, September 27, 2015

Late to the Daily 5 Party

I've been married for 3 and a half years, and earlier this month I got my wedding band resized.  I got the engagement ring resized the week before, and I was so happy with the fit I told the guy, "I don't know why I waited so long!"  He said, "Well, it fits now, so just be glad you've done it."
Image from the public domain

That's how I feel with the Daily 5.

I know I'm late to the party on this one.  I tried to start it last year.  I claimed I was doing it all year.  I hung up the free posters the previous teacher printed off and named my 5 literacy activities using the proper lingo.  My teaching partner briefly explained to me the way write each child's choice on a clipboard each day, but frankly I was like a fish out of water teaching first grade last year.  Releasing responsibility like this was just too scary.

But I think I get it now.

I finally read The Two Sisters' book cover to cover.  And I realized that although I used the lingo, I was not doing Daily 5 last year.  I was doing centers.  And there is nothing wrong with centers!  It served me well during a "learning year."  But there were pieces of the management puzzle that just were not working for me.  I had heterogeneous groups going to each station while trying to pull homogenous groups.  Kids were missing stations that they were really looking forward to, and I was having a hard time working around this in order to keep their moral and motivation higher.  Now that I understand how the Daily 5 system is supposed to work, I see how students will never get "skipped over" when it comes to their favorite activity; they can choose it the very next time after I confer with them.

I've been rolling out the components pretty much to the letter (the book says what every good teacher knows; adjustments need to be made for each class's needs each year, so of course I have).  Each of the 5 is rolled out in an order that makes sense, with mini-lessons on the many sub-skills.  The lessons are designed in a smart way to help the kids learn the behaviors that are expected.  For example, the lesson on choosing "good fit books" that draws several specific comparisons to "good fit shoes" was not only relevant, it was so fun watching my firsties trying on each other's shoes!  They couldn't believe I was letting them do that during a reading lesson!

Having a mini lesson between each rotation has also helped us take responsibility for good reading behaviors and build our stamina.  I can refer to the anchor charts we make together (as opposed to the premade posters from last year) and re-teach a behavior if I had to cut a practice time short due to off task behaviors.  Then I immediately send them back to the same spot to try again.  Or, when students are on task, we come together to celebrate, then learn a new routine/behavior.  And of course, I still save one mini-lesson slot each day for my basal program.

I feel like I'm really walking the walk now, and so far it feels right!  I am so excited to see how my class evolves during Reader's Workshop.  Everyone told me that that's the beauty of teaching first grade; you see a huge amount of growth in students' reading and writing.  And although I did last year, I am dreaming of even more this year as they make choices.  I didn't realize until the end of the year how more committed and invested first graders are in learning how to read and write.  I am starting to see why letting them choose their order of activities when I'm not conferring will be motivating and lead to better focus in each activity.


My Teachers Pay Teachers Store
My Pinterest